Understanding Transactions API in Actions on Google by reading a sample code
You can integrate a purchase and reservation feature with your Google Assistant App using the Transactions API. But, you may not understand the usage of the Transactions API, because there are some steps, some intents, some events and some data structures. That is, it is complex.
Fortunately, there is a sample code set to understand the Transactions API more easily. I would like to describe each step on the sample code here to integrate the Transactions API with your app.
https://github.com/actions-on-google/dialogflow-transactions-nodejs
Get the Sample Code Set
You can clone the sample code set by typing the following command:
git clone https://github.com/actions-on-google/dialogflow-transactions-nodejs
Basically, you can build the whole environment to try all transaction process by the steps described by the
README.md file. I don’t mention about how to build the environment here. Instead, I would like to describe
behaviors of the Transactions API.
Process Flow Diagram
The dialogflow-transactions-nodejs sample has the following process flow.
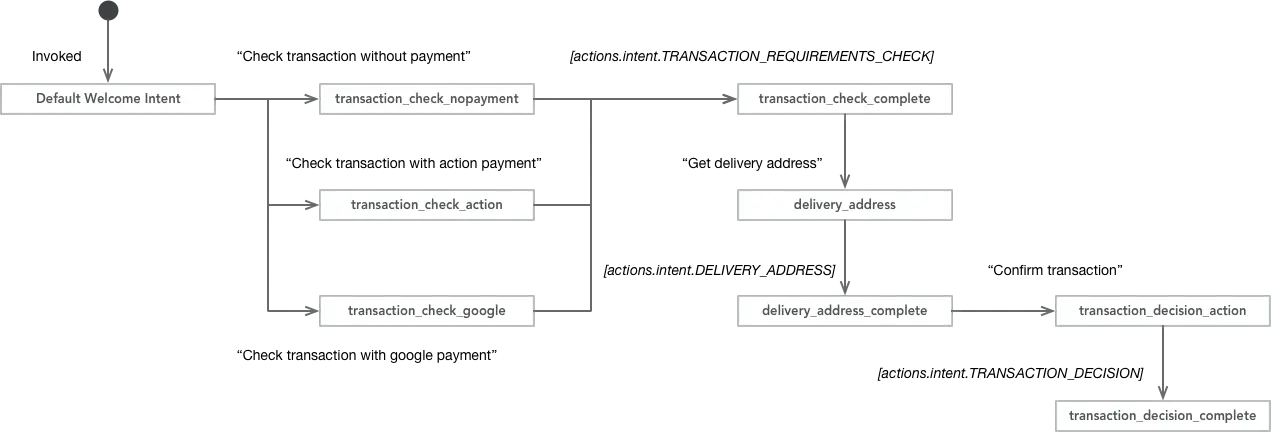
An actual transaction consists of the following steps:
- Check whether the user can do a new transaction requested by the Assistant app.
- Get a delivery address from the user, if need.
- Decide whether the user really executes the transaction.
Let’s get started to see each behavior.
Welcome Message

When the app is invoked, the app says a welcome message. This welcome message is set up into the Default Welcome Intent
intent, and the welcome message string is fixed. Also, this intent does not use a fulfillment webhook.
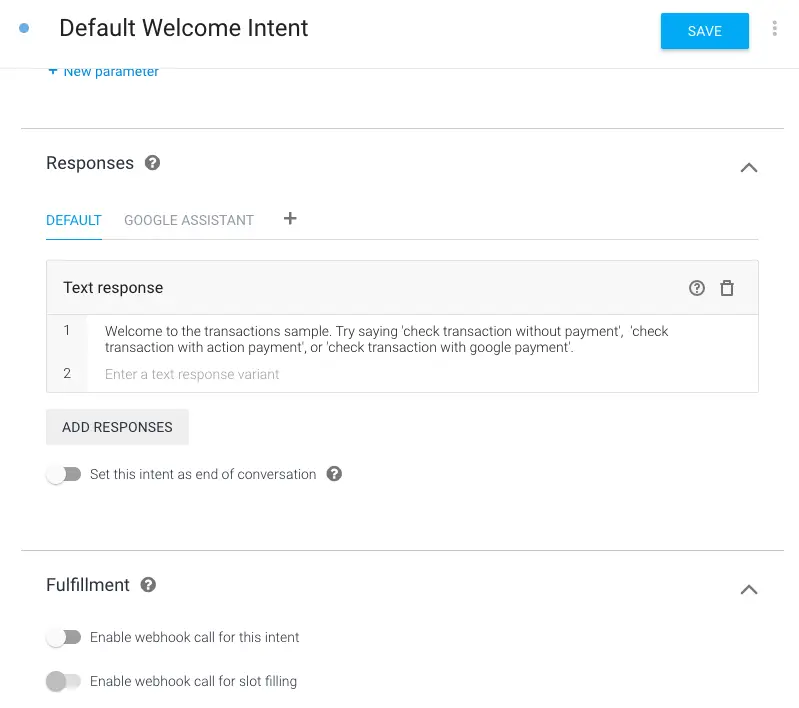
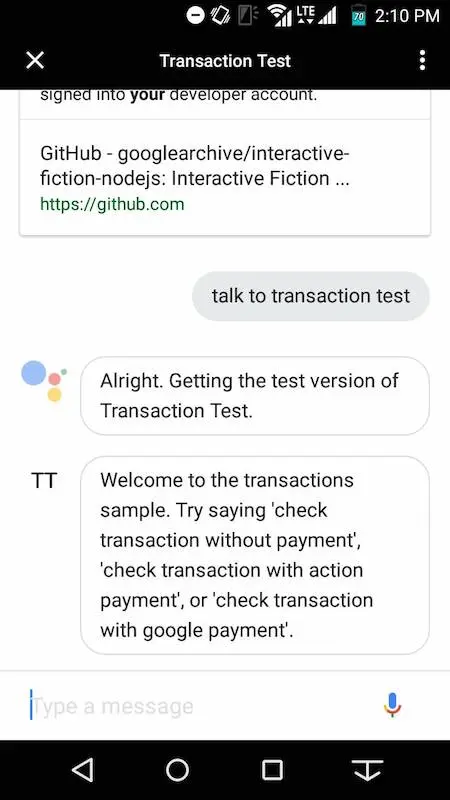
This is simple. There is no any code. The user read like the following message:
When the user says “Check transaction without payment”

The “transaction_check_nopayment” intent has a training phrase “Check transaction without payment”. This means that this intent will be invoked if the user says the phrase.
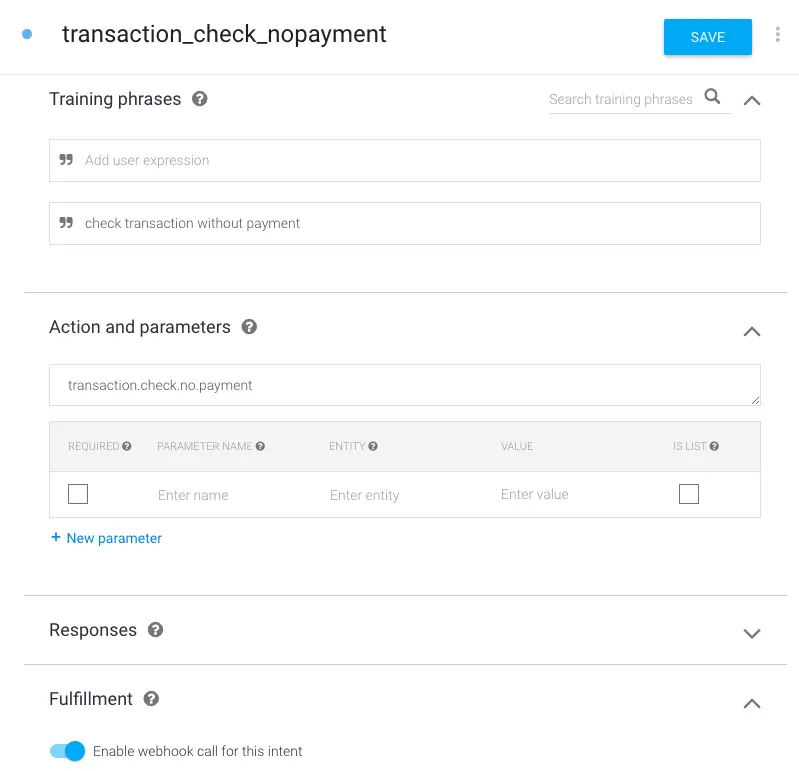
This intent calls the fulfillment webhook. The code to handle the intent is the following:
app.intent('transaction_check_nopayment', (conv) => {
  conv.ask(new TransactionRequirements());
});
This handler call the ask() function of the DialogflowConversation class with the argument.
The TransactionRequirements class passed as the argument represents the request to check whether the user is in
transactable state. That is, this class indicates the actions.intent.TRANSACTION_REQUIREMENTS_CHECK built-in intent.
Actions on Google checks the user’s state after receiving the response including the
actions.intent.TRANSACTION_REQUIREMENTS_CHECK intent.
When the user says “Check transaction with action payment”

This user phrase “Check transaction with action payment” is registered in the intent named “transaction_check_action”.
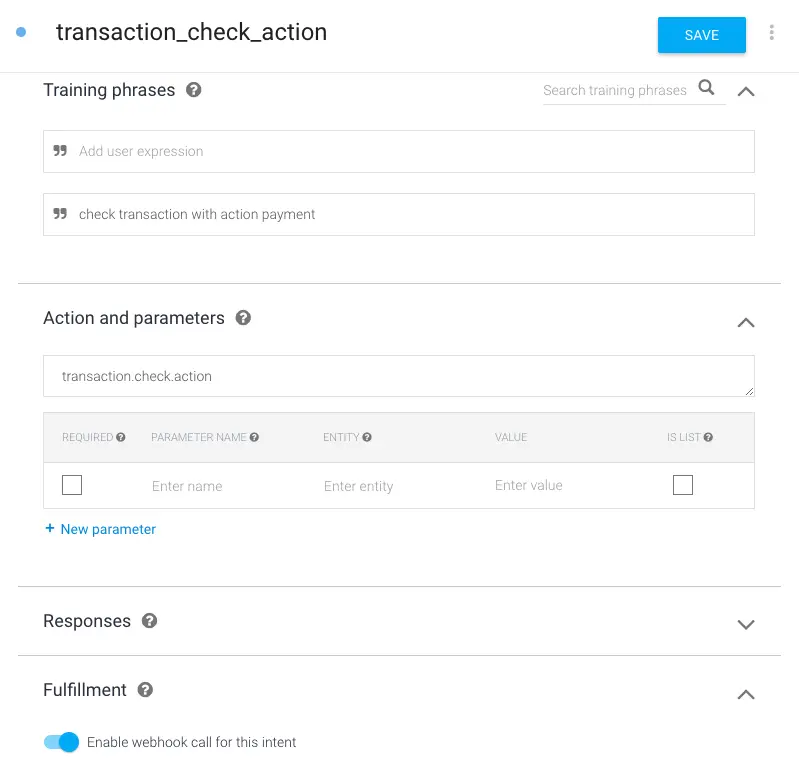
As same as the previous intent, the fulfillment is called. The code is below:
app.intent('transaction_check_action', (conv) => {
  conv.ask(new TransactionRequirements({
    orderOptions: {
      requestDeliveryAddress: false,
    },
    paymentOptions: {
      actionProvidedOptions: {
        displayName: 'VISA-1234',
        paymentType: 'PAYMENT_CARD',
      },
    },
  }));
});
This code also requests the actions.intent.TRANSACTION_REQUIREMENTS_CHECK built-in intent with the
TransactionRequirements class. However, in this handler code, some configuration are set to indicate the own
payment for this app. The configuration options are defined as GoogleActionsV2TransactionRequirementsCheckSpec. For instance, there are two properties:
-
orderOptions- represented by theGoogleActionsV2OrdersOrderOptionsclass. Developers can specify a customer information and a flag of whether requests a delivery address. -
paymentOptions- represented by theGoogleActionsV2OrdersPaymentOptionsclass.
In this case, the actionProvidedOptions property is specified, because the user selects an action payment.
Developers need to provide two values: displayName and paymentType defined by the
GoogleActionsV2OrdersActionProvidedPaymentOptions class.
Actions on Google checks the user’s state according to the response.
When the user says “Check transaction with google payment”
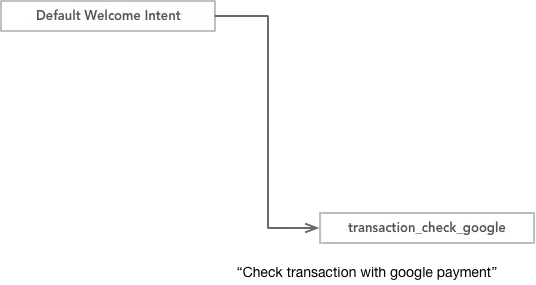
The last user phase is “Check transaction with google payment”. This phrase is defined the “transaction_check_google” intent.
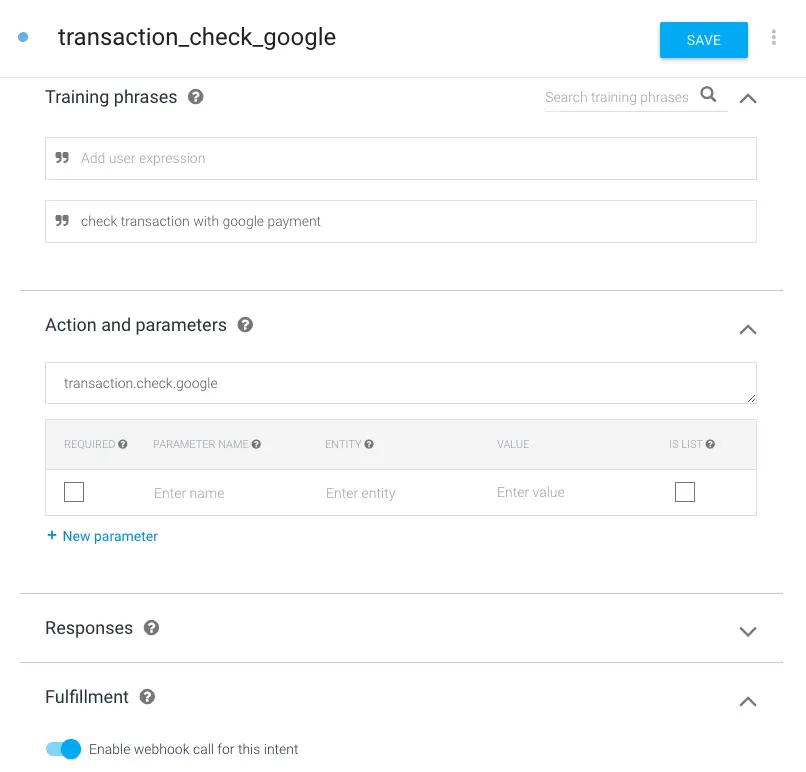
This intent is almost same as other intents above. Of course, this intent uses the fulfillment. So, the fulfillment code is…
app.intent('transaction_check_google', (conv) => {
  conv.ask(new TransactionRequirements({
    orderOptions: {
      requestDeliveryAddress: false,
    },
    paymentOptions: {
      googleProvidedOptions: {
        prepaidCardDisallowed: false,
        supportedCardNetworks: ['VISA', 'AMEX'],
        // These will be provided by payment processor,
        // like Stripe, Braintree, or Vantiv.
        tokenizationParameters: {},
      },
    },
  }));
});
As the comment in the code, this handler code is incomplete. To use Google-provided payment method, you need to
specify the googleProvidedOptions property defined by the
GoogleActionsV2OrdersGoogleProvidedPaymentOptions class.
In the code above, the tokenizationParameters value is empty. Actually, you need to specify some value to the
property. Actually, the property is described by the document like the following:
These tokenization parameters will be used for generating payment token for use in transaction. The app should get these parameters from their payment gateway.
This means that you need to issue and get a payment token from some payment gateway like Stripe, Braintree, or Vantiv. At the time, you may retrieve two tokens: for production and for testing. If you try to fulfill the transaction in the sandbox, you need to specify the payment token for testing.
When the tokenizationParameters value is empty and the user try to use the google payment, Google Assistant will return
the success response. However, the transaction will be failed at the transaction confirmation.
After checking the user’s state
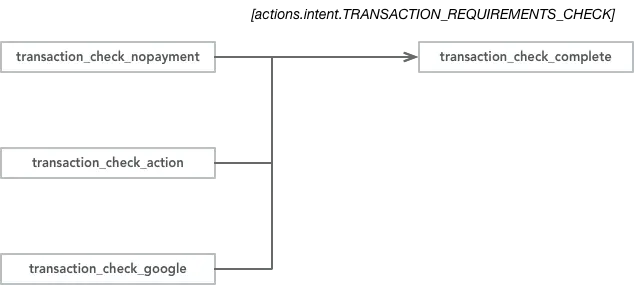
Actions on Google checks whether the user can fulfill the transaction. After the checking, Actions on Google sends a
actions.intent.TRANSACTION_REQUIREMENTS_CHECK event to the Dialogflow. In this sample, this event is received by
“transaction_check_complete” intent.
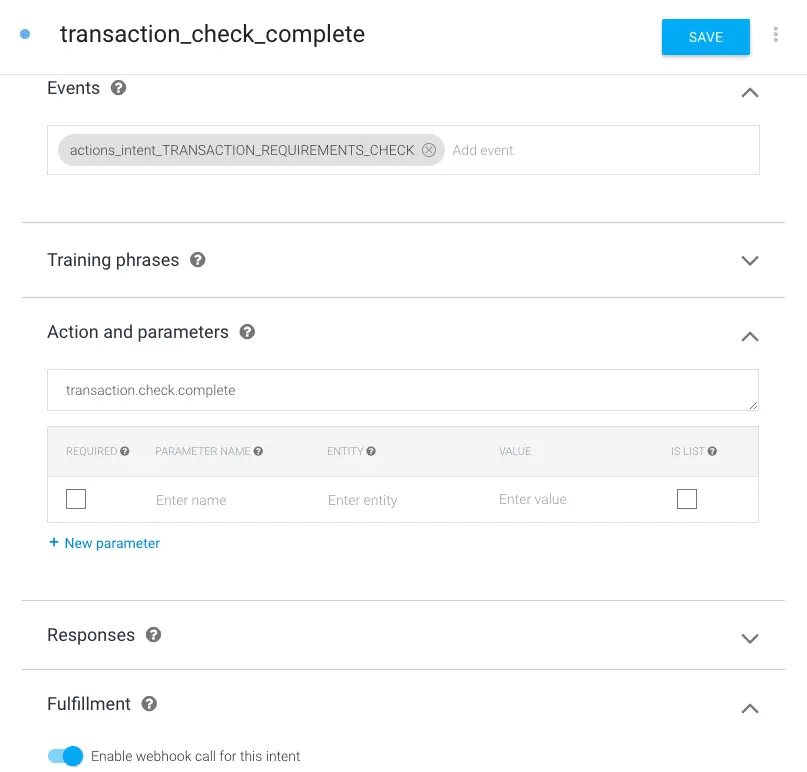
This intent has no any training phrases. Instead, the event name actions.intent.TRANSACTION_REQUIREMENTS_CHECK is set.
In the previous intent calling, Dialogflow returns the response including the
actions.intent.TRANSACTION_REQUIREMENTS_CHECK built-in intent. After receiving the response by Actions on Google,
Actions on Google checks the user’s state, then the actions.intent.TRANSACTION_REQUIREMENTS_CHECK event is send from
Actions on Google to Dialogflow. This means that there is no user interaction during the flow. This is called as
“silent intent”.
At sending the event, the request has the result of the transaction check. In the handler code in the fulfillment, you can know the result as the following:
app.intent('transaction_check_complete', (conv) => {
  const arg = conv.arguments.get('TRANSACTION_REQUIREMENTS_CHECK_RESULT');
  if (arg && arg.resultType ==='OK') {
    // Normally take the user through cart building flow
    conv.ask(`Looks like you're good to go! ` +
      `Try saying "Get Delivery Address".`);
  } else {
    conv.close('Transaction failed.');
  }
});
If the value of the TRANSACTION_REQUIREMENTS_CHECK_RESULT argument is OK, the user’s state is ok. Otherwise, the user
cannot fulfill the transaction. In the sample above, the conversation is closed with conv.close() when the user’s
state is not ok.
The user will see the response message from the app like below:
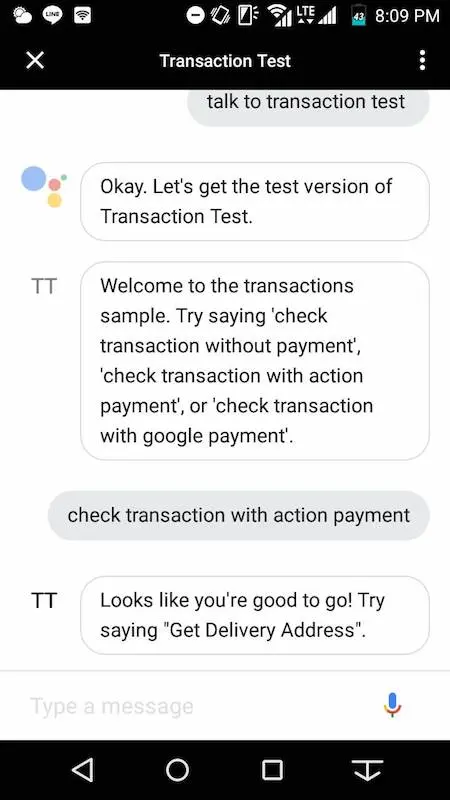
When the user says “Get delivery address”
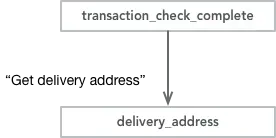
In the previous message, the user navigate to say to determine the delivery address for the transaction. When the user says the phrase, the intent named “delivery_address” is invoked.
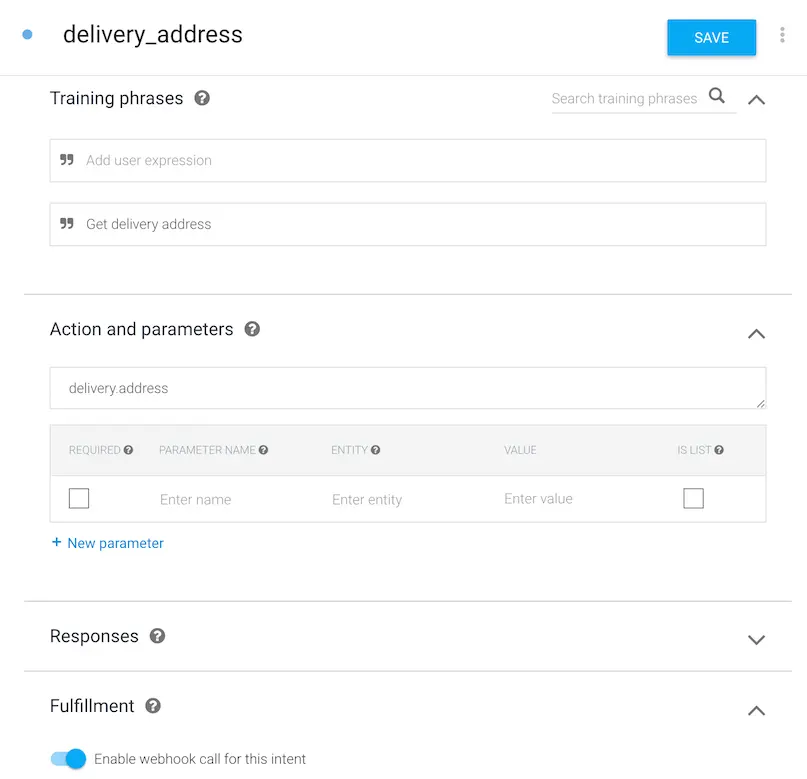
Basically, this intent is very simple which calls the fulfillment only. The handler function of the fulfillment in this sample is below:
app.intent('delivery_address', (conv) => {
  conv.ask(new DeliveryAddress({
    addressOptions: {
      reason: 'To know where to send the order',
    },
  }));
});
This handler function doesn’t send any response text. Instead, the instance of the
DeliveryAddress
class is passed to the conv.ask() function. To pass the instance, Dialogflow returns the response including the
actions.intent.DELIVERY_ADDRESS built-in intent to Actions on Google.
After reeiving the actions.intent.DELIVERY_ADDRESS intent, Actions on Google asks the user the address where the user
wants to deliver the order. That is, the user receives the response message from Google Assistant like the following:
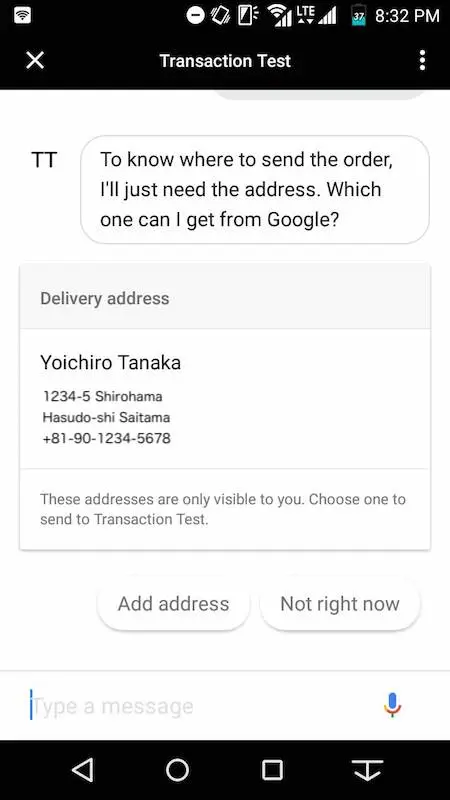
In Google Assistant on Android device, addresses the user registered show as the rich card messages. The user can tap the card of the address which wants to deliver.
When the user taps the card

By tapping the card, the delivery address is determined. Then, Actions on Google sends the event named
actions.intent.DELIVERY_ADDRESS to the Dialogflow so that the user determines the delivery address. Of course,
this sample provides the intent to recieve the event. The name is “delivery_address_complete”.
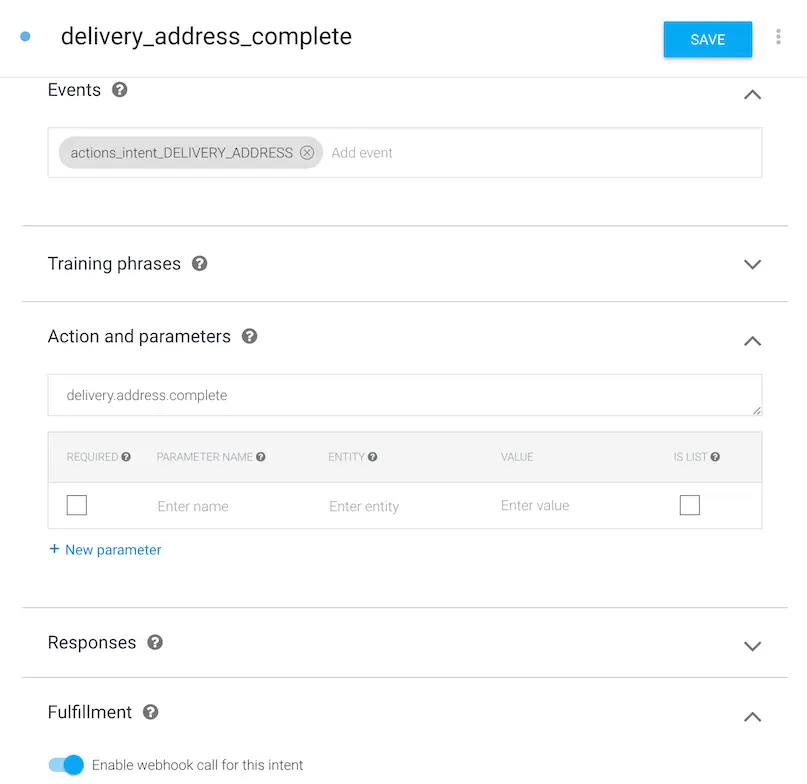
The task of this intent is only to call the fulfillment as same as other intents. The handler function of this sample is:
app.intent('delivery_address_complete', (conv) => {
  const arg = conv.arguments.get('DELIVERY_ADDRESS_VALUE');
  if (arg.userDecision ==='ACCEPTED') {
    console.log('DELIVERY ADDRESS: ' +
    arg.location.postalAddress.addressLines[0]);
    conv.data.deliveryAddress = arg.location;
    conv.ask('Great, got your address! Now say "confirm transaction".');
  } else {
    conv.close('I failed to get your delivery address.');
  }
});
The request of the event actions.intent.DELIVERY_ADDRESS has the delivery address information which the user determined.
You can get the information from the DELIVERY_ADDRESS_VALUE argument. If the user did not accept to pass the delivery
address to the app, the value of arg.userDecision is not ACCEPTED, and this app ends the conversation with
conv.close() function in this sample.
If the user accepts, the retrieved delivery address is stored into the conv.data to use at creating an order.
Finally, this app navigates to the next step by the response message.
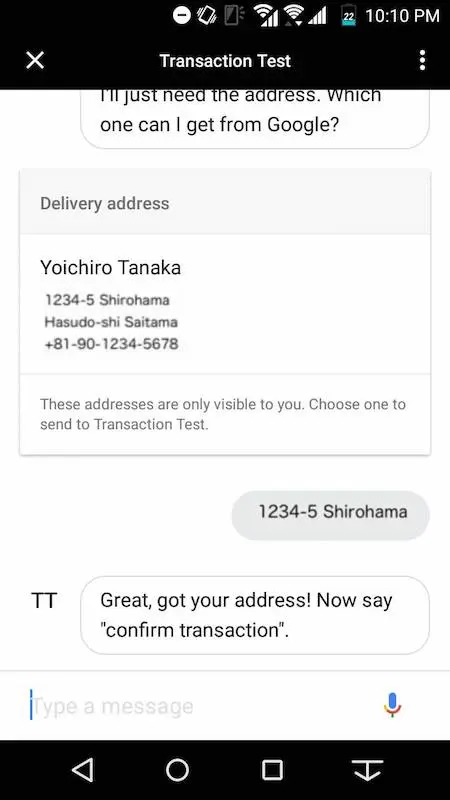
When the user says “Confirm transaction”

After getting the user’s delivery address, when the user says “Confirm transaction”, the intent named “transaction_decision” is called.
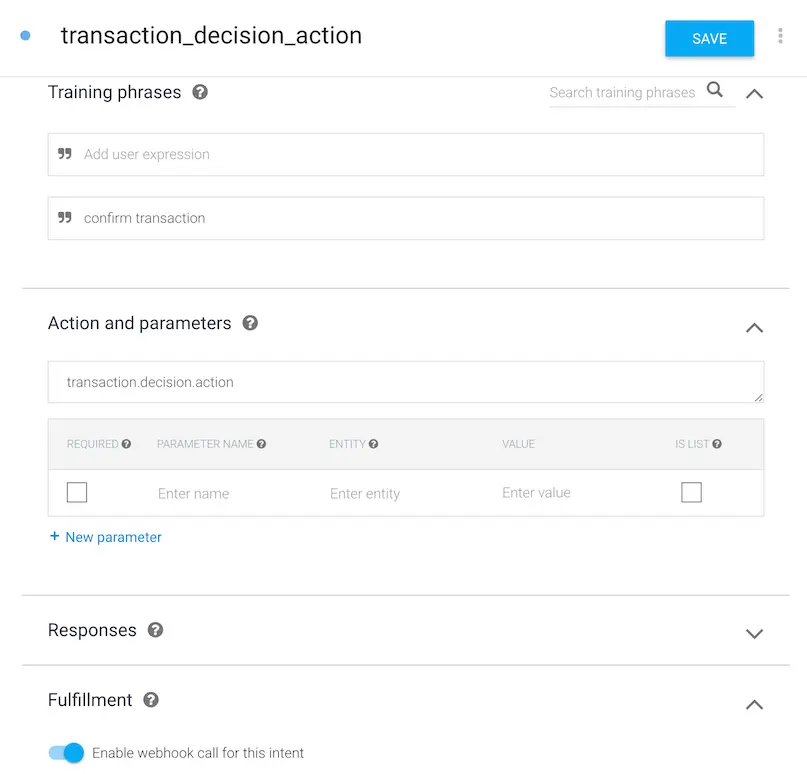
The important point here is not the intent, but is the fulfillment code. The function to handle the intent has a responsibility to show the user the target order’s summary and ask to confirm whether the user wants to fulfill the transaction. To create the order’s information, the code size tends to become long.
Let’s see the fulfillment code. First, the code below is to create the order information. Note that it is edited to omit some parts.
app.intent('transaction_decision_action', (conv) => {
  const order = {
    id: UNIQUE_ORDER_ID,
    cart: {
      merchant: {
        id: 'book_store_1',
        name: 'Book Store',
      },
      lineItems: [
        {
          name: 'My Memoirs',
          id: 'memoirs_1',
          price: {
            amount: {
              currencyCode: 'USD',
              nanos: 990000000,
              units: 3,
            },
            type: 'ACTUAL',
          },
          quantity: 1,
          subLines: [
            {
              note: 'Note from the author',
            },
          ],
          type: 'REGULAR',
        },
        ...
      ],
      notes: 'The Memoir collection',
      otherItems: [
        {
          name: 'Subtotal',
          id: 'subtotal',
          price: {
            amount: {
              currencyCode: 'USD',
              nanos: 220000000,
              units: 32,
            },
            type: 'ESTIMATE',
          },
          type: 'SUBTOTAL',
        },
        {
          name: 'Tax',
          id: 'tax',
          price: {
            amount: {
              currencyCode: 'USD',
              nanos: 780000000,
              units: 2,
            },
            type: 'ESTIMATE',
          },
          type: 'TAX',
        },
      ],
    },
    otherItems: [],
    totalPrice: {
      amount: {
        currencyCode: 'USD',
        nanos: 0,
        units: 35,
      },
      type: 'ESTIMATE',
    },
  };
The order information is represented by the GoogleActionsV2OrdersProposedOrder
class. This consists of some parts. For instance, the object has some properties in this sample like below:
-
id- Unique ID for the order. -
cart- User’s items. -
totalPrice- The total price of this otder.
Furthermore, the cart represented by the GoogleActionsV2OrdersCart class has the following properties:
-
merchant- Merchant information for this order. -
lineItems- The goods or services the user is ordering. -
otherItems- In this sample, this property has the subtotal and the tax information.
In this sample, the user can determine the delivery address. However, the user also can omit it. Instead, the user
can say “Confirm transaction” without “Get delivery address”. If the user omits to specify the delivery address,
the conv.data session object does not have the delivery address information. In the other hand, if the information
exists in the conv.data, you can include the delivery address information into the order information. The code
below has the task:
  if (conv.data.deliveryAddress) {
    order.extension = {
      '@type': GENERIC_EXTENSION_TYPE,
      'locations': [
        {
          type: 'DELIVERY',
          location: {
            postalAddress: conv.data.deliveryAddress.postalAddress,
          },
        },
      ],
    };
  }
Ok, you got the complete order information object. Now you need to ask the user whether confirm the order and fulfill
the transaction. To do this, you use the TransactionDecision class. In this sample, The Transactiondecision instance is passed to the conv.ask() function
like below:
  // To test payment w/ sample,
  // uncheck the 'Testing in Sandbox Mode' box in the
  // Actions console simulator
  conv.ask(new TransactionDecision({
    orderOptions: {
      requestDeliveryAddress: true,
    },
    paymentOptions: {
      actionProvidedOptions: {
        paymentType: 'PAYMENT_CARD',
        displayName: 'VISA-1234',
      },
    },
    proposedOrder: order,
  }));
The code above is for the payment method provided by the action. That is, the actionProvidedOptions value is specified.
If a payment is unnecessary, the value of the paymentOptions can be omitted. In the other hand, if the app uses
the Google-provided payment method, you need to enable the code below in the sample code instead of the code above:
  // If using Google provided payment instrument instead
  conv.ask(new TransactionDecision({
    orderOptions: {
      requestDeliveryAddress: false,
    },
    paymentOptions: {
      googleProvidedOptions: {
        prepaidCardDisallowed: false,
        supportedCardNetworks: ['VISA', 'AMEX'],
        // These will be provided by payment processor,
        // like Stripe, Braintree, or Vantiv.
        tokenizationParameters: {},
      },
    },
    proposedOrder: order,
  }));
This code uses the googleProvidedOptions property instead of the actionProvidedOptions. Of course, you must
specify the tokenizationParameters value for the payment processor you use.
By passing the TransactionDecision instance, the event named actions.intent.TRANSACTION_DECISION is
returned to the Actions on Google.
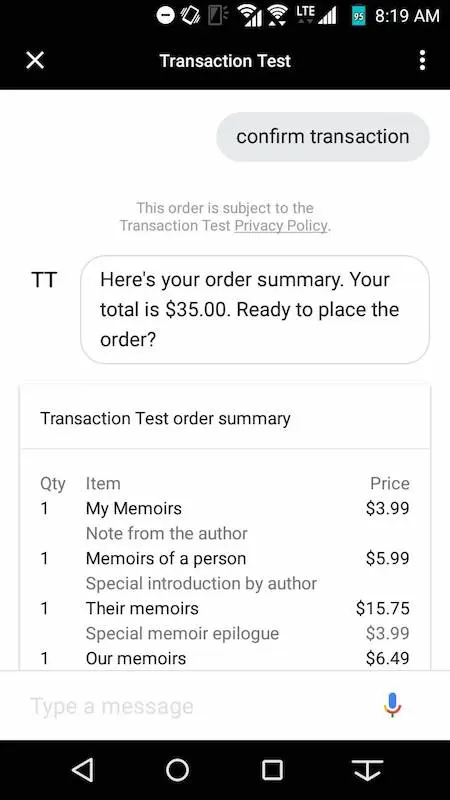
When Actions on Google receives the actions.intent.TRANSACTION_DECISION event, Google Assistant shows the user
the order summary as the response messages like below:
And,
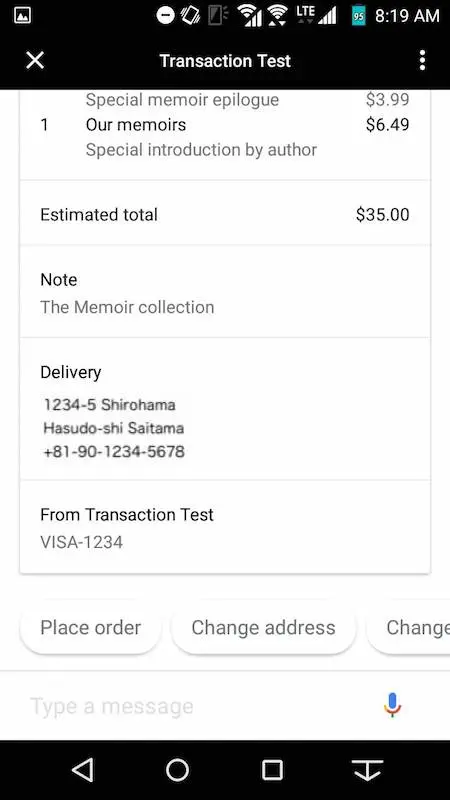
When the user says “Place order”, Google Assistant shows the payment UI like below:
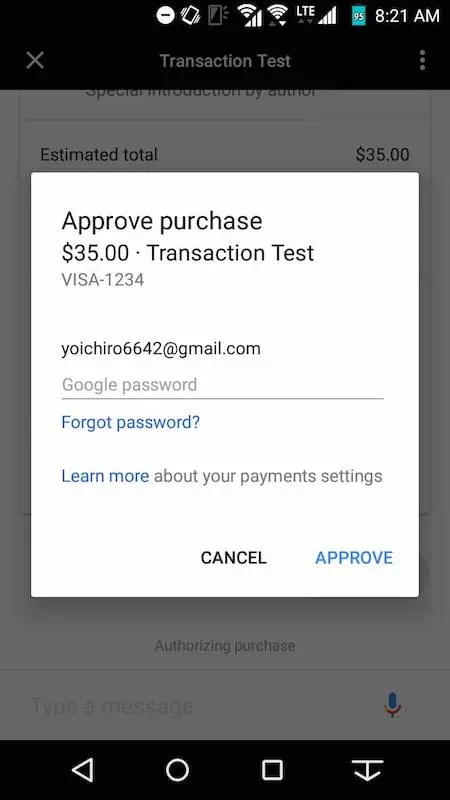
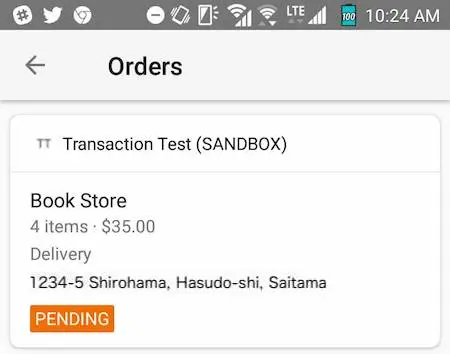
The user needs to enter the password and to click “APPROVE” button to decide the transaction. At this time, the order’s state is PENDING.
When the user approves the payment

If the user approves the payment, Actions on Google sends the actions.intent.TRANSACTION_DECISION to the Dialogflow.
In this sample, the event is received by the intent named “transaction_decision_complete”.
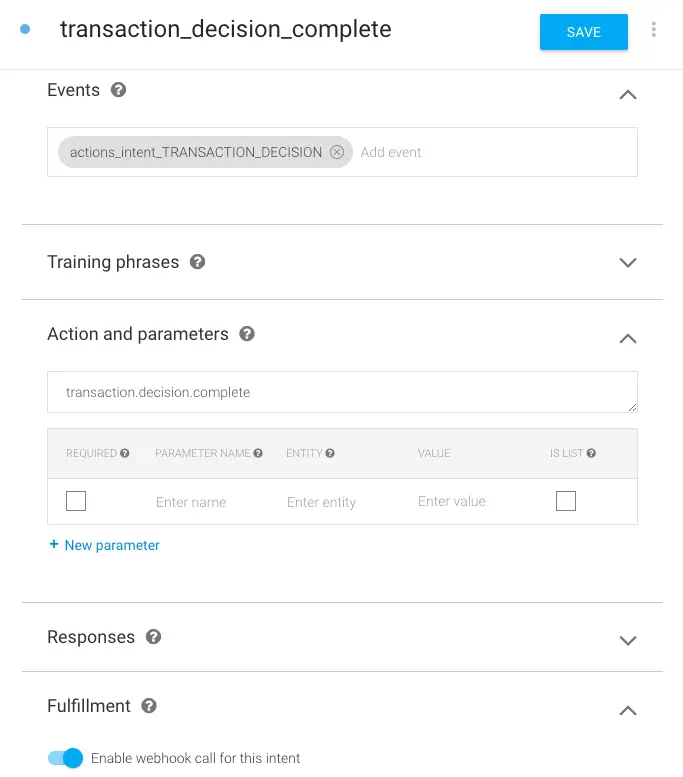
The handler code to handle this intent is the following. First, you need to check the user decision. To do this,
you can check the userDecision value of the conv.arguments.get('TRANSACTION_DECISION_VALUE') argument.
app.intent('transaction_decision_complete', (conv) => {
  console.log('Transaction decision complete');
  const arg = conv.arguments.get('TRANSACTION_DECISION_VALUE');
  if (arg && arg.userDecision ==='ORDER_ACCEPTED') {
    ...
If the userDecision value is ORDER_ACCEPTED, this means that the user accepts the payment. At this time, you need
to update the order’s state to CREATED. The OrderUpdate class is used for the updating.
    ...
    const finalOrderId = arg.order.finalOrder.id;

    // Confirm order and make any charges in order processing backend
    // If using Google provided payment instrument:
    // const paymentDisplayName = arg.order.paymentInfo.displayName;
    conv.ask(new OrderUpdate({
      actionOrderId: finalOrderId,
      orderState: {
        label: 'Order created',
        state: 'CREATED',
      },
      lineItemUpdates: {},
      updateTime: new Date().toISOString(),
      receipt: {
        confirmedActionOrderId: UNIQUE_ORDER_ID,
      },
      // Replace the URL with your own customer service page
      orderManagementActions: [
        {
          button: {
            openUrlAction: {
              url: 'http://example.com/customer-service',
            },
            title: 'Customer Service',
          },
          type: 'CUSTOMER_SERVICE',
        },
      ],
      userNotification: {
        text: 'Notification text.',
        title: 'Notification Title',
      },
    }));
    ...
In the code above of this sample, the following properties are set:
-
orderState- Specify the new stateCREATED. -
receipt- Specify the order ID to map the receipt. -
orderManagementActions- Specify the customer support information. -
userNotification- The text and title for notification.
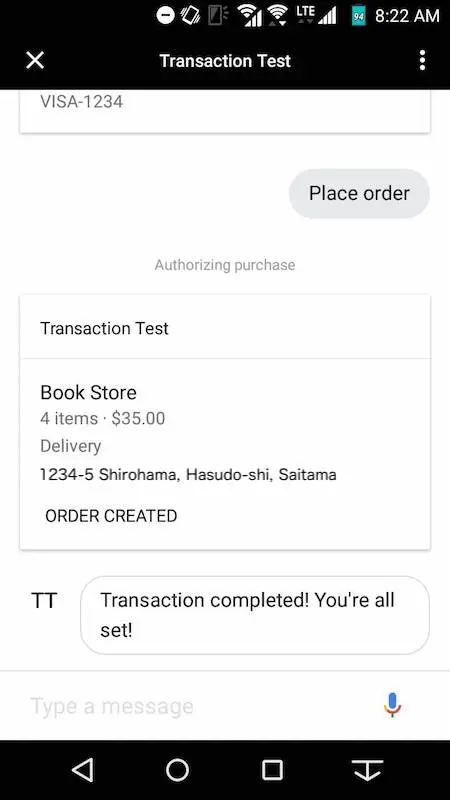
Finally, you sends the response message with the conv.ask() function to let the user to complete the transaction.
    ...
    conv.ask(`Transaction completed! You're all set!`);
  } else if (arg && arg.userDecision === 'DELIVERY_ADDRESS_UPDATED') {
    conv.ask(new DeliveryAddress({
      addressOptions: {
        reason: 'To know where to send the order',
      },
    }));
  } else {
    conv.close('Transaction failed.');
  }
});
If the userDecision value is DELIVERY_ADDRESS_UPDATED, this means that the user wants to update the
delivery address. In this case, you need to navigate the user to determine the delivery address with
the DeliveryAddress class as I described the previous section.
After executing the code above, Google Assistant sends the response messege to the user like below:
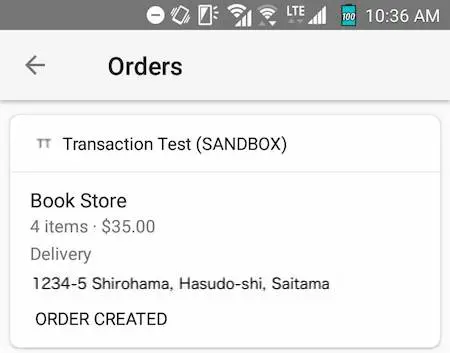
In the order history page of Google Assistant, the user can see the latest state ORDER CREATED.
Conclusion
In this entry, I described the behavior of the Actions on Google Transactions API. It would be great if you can understand the architecture, the process steps and each code by reading this.


