There are many apps in the world. Currently, most apps have a graphical user interface. But, most developers have a problem how to test the user interface. Especially, it is difficult to do an End-to-End test for GUI apps. Some solutions to do the End-to-End test have been provided, but the End-to-End testing is a big theme in the information industry.
In all developers who are building apps for the Google Assistant, the End-to-End testing is very important thing. Nick Felker (Google Developer Advocate) has started a project to bring the End-to-End testing for apps of the Google Assistant. The project is actions-on-google-testing-nodejs. The developers can write codes to do the End-to-End test with the library. Nick, thank you for the great work!
I would like to show you how to use this library and how to write the End-to-End test code with the library here.
Prepare a new directory and files
First, you need to create a new directory. The directory will have some files to do the End-to-End testing.
$ cd $HOME
$ mkdir actions-test
$ cd actions-test
Create a new node project
Next, execute the npm command to create and initialize a new node project. You can put any name for the project.
Basically, you can apply default values for each question.
$ npm init
<Press enter, enter, ...>
After creating the new project, you can see the package.json file was created.
Install dependent libraries
Now, you have the node project to build the End-to-End test environment. It is a time to install the
actions-on-google-testing library and other dependent libraries by the following command:
$ npm install actions-on-google-testing --save
$ npm install chai --save
We install the chai library to use each assertion function here.
Create a new AoG project
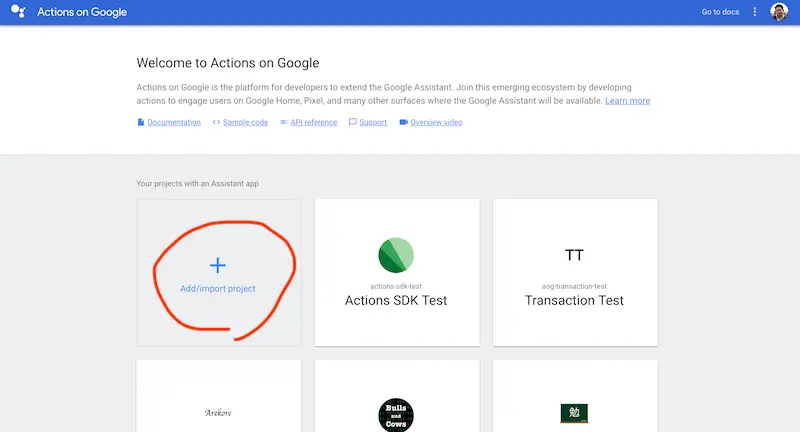
Here, lets leave from your terminal and go to your web browser. To use the Google Assistant for testing, you need to create a new Actions on Google project.
Visit the Actions on Google console. Then, click the Add/import project
button.
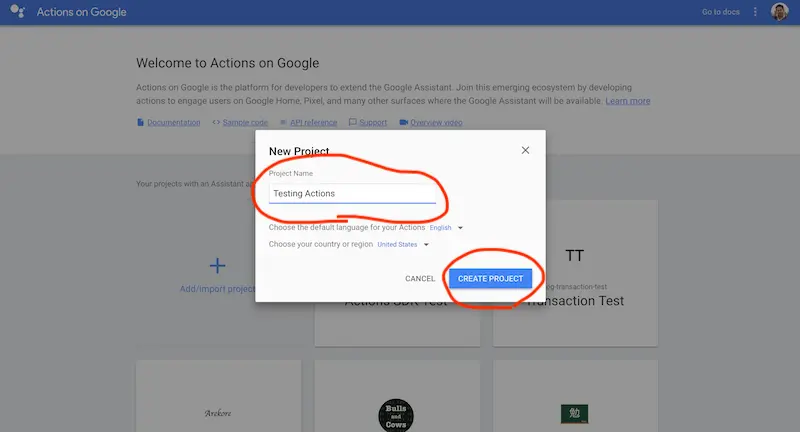
Enter your project name, and click the CREATE PROJECT button.
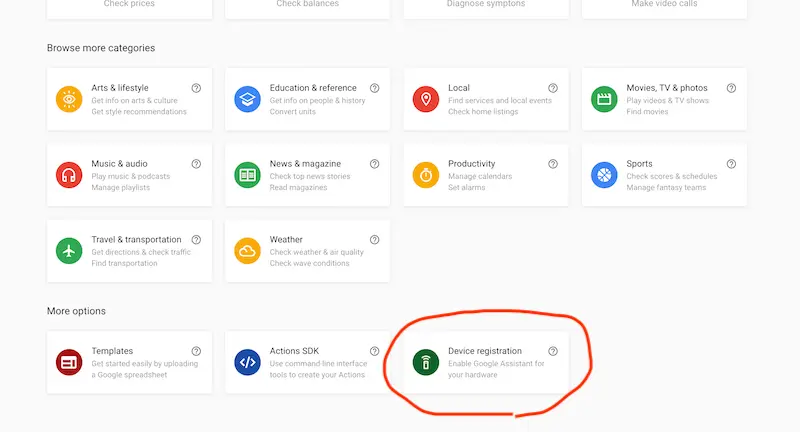
The actions-on-google-testing library needs an AoG project which applied Device registration. You can find the
Device registration menu item on the bottom of the page. Click the Device registration menu item.
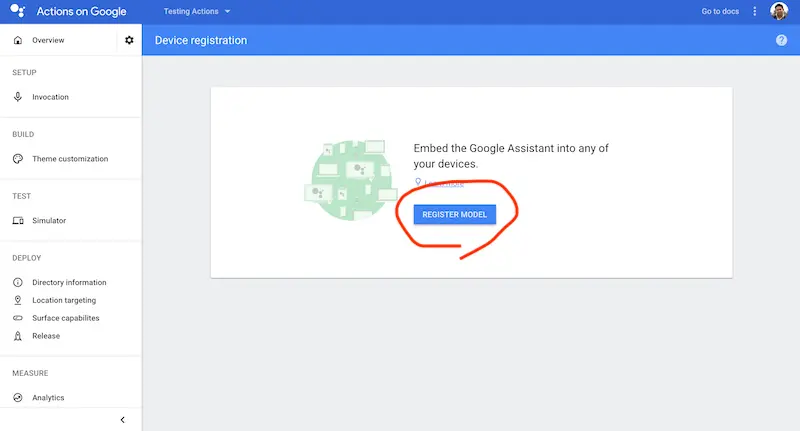
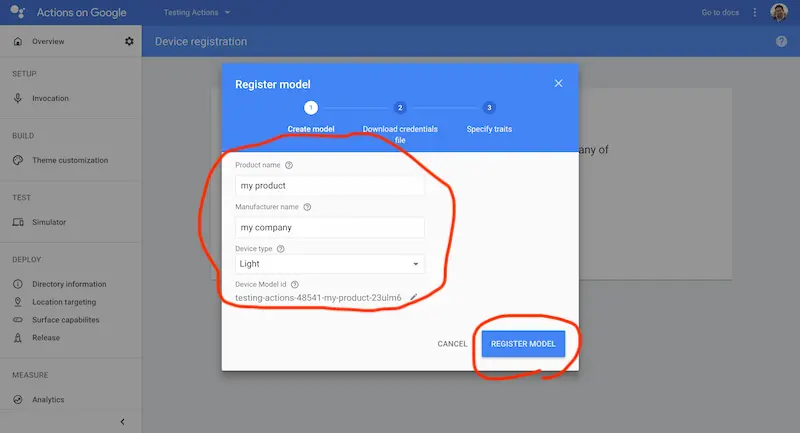
On the next page, click the REGISTER MODEL button.
After clicking the button, you will see the popup dialog. Fill in the following fields. Actually, these field values are not important.
- Product name - Any product name (ex. “my product”)
- Manufacturer name - Any manufacturer name (ex. “my company”)
- Device type - Light (Of course, you can select other item)
Then, click the REGISTER MODEL button.
Download the credential file
If the Device registration is successfully, you can download the credential file from the next page. To download the
file, click the Download credentials.json button.
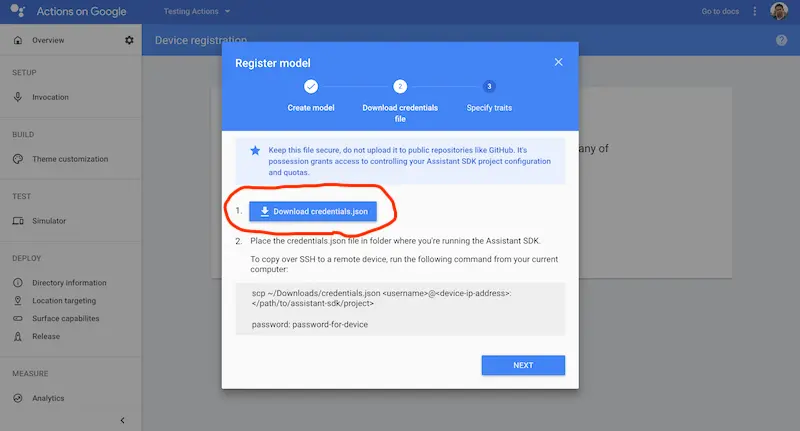
Specify the directory which was created by the previous step as the target directory to download the file. Then,
click the NEXT button.
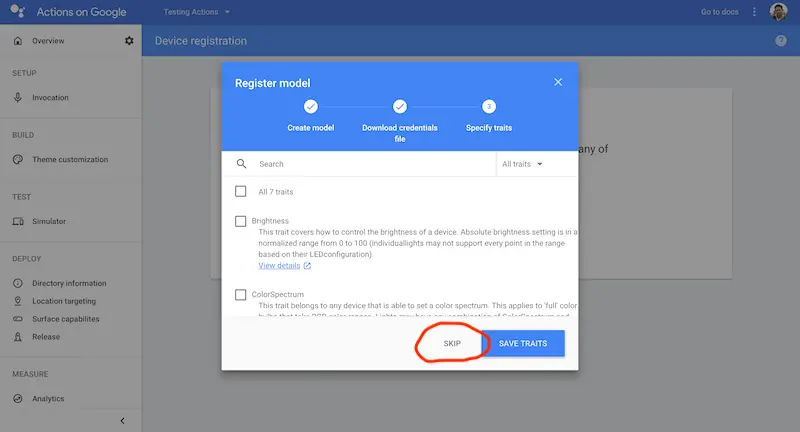
The next page is to specify traits. But, it is not necessary here. Click the SKIP.
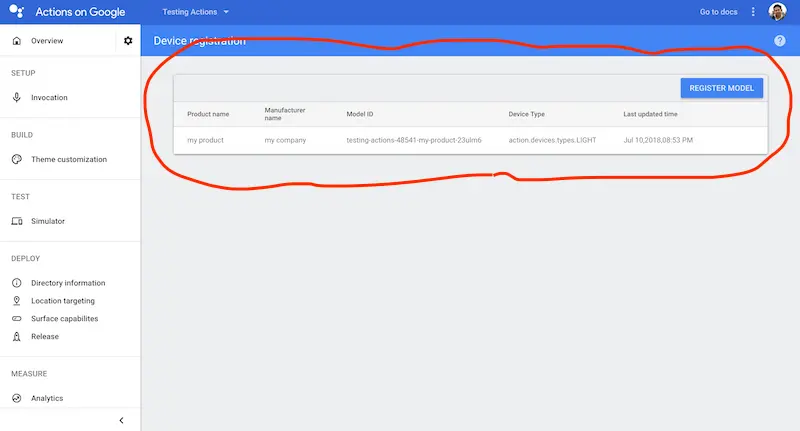
After clicking the SKIP, you will see the registered device model on the next screen like the following:
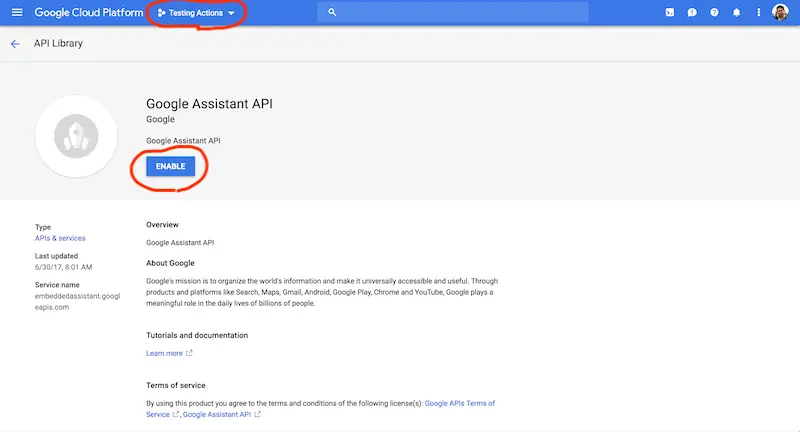
Enable Google Assistant API
The actions-on-google-testing library uses the Google Assistant API to communicate with the Google Assistant. Therefore, you need to enable the Google Assistant API for your project. When creating the AoG project, the GCP project also has been created at the same time. You can enable the API from the GCP console.
With your web browser, access to the following URL:
https://console.cloud.google.com/apis/library/embeddedassistant.googleapis.com?q=Assistant
If your target project is not selected, you need to select the target project on the top of the page. Then, click the
ENABLE button to enable the Google Assistant API.
Convert the credential file
You need to convert the downloaded credential file. For instance, the access token is necessary to use the Google Assistant API. In the actions-on-google-testing library, the convert tool has been providing. Run the following command to convert the credential file.
$ mkdir test
$ node ./node_modules/actions-on-google-testing/generate-credentials.js ./credentials.json
The generate-credentials.js command outputs the URL to authorize to use the Google Assistant API (the
actions-on-google-testing library communicates with the Google Assistant via the Google Assistant API).
Reading data for project "testing-actions-*****"
Please go to the following link to authorize, then copy the code below
https://accounts.google.com/o/oauth2/v2/auth?...
Authorization code:
Open the URL on your web browser. First, you need to select your Google account.
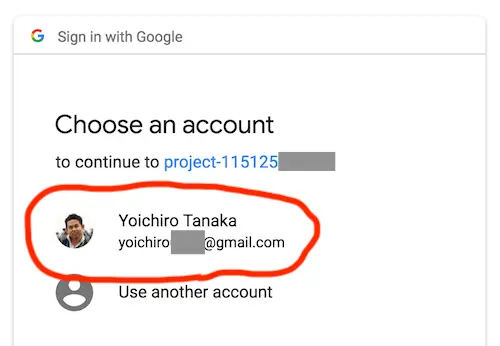
Then, authorize to use the Google Assistant API.
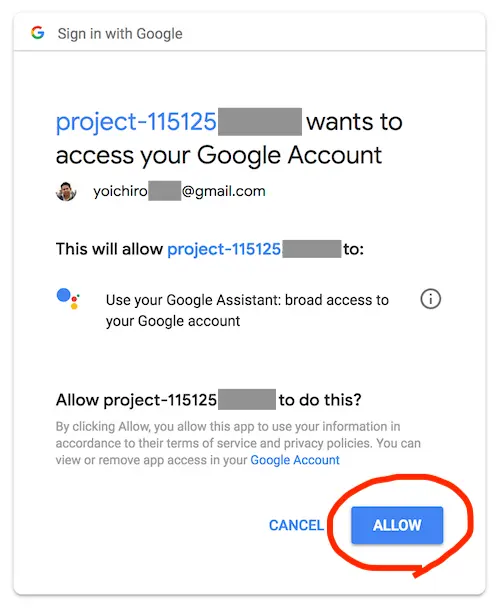
After the authorization, you will see the authorization code on the next page. Copy the code, and paste your terminal.
The access token and other parameters will be written in the test/test-credentials.json file.
Saved user credentials in "test/test-credentials.json"
You are now ready to run tests
Make sure you DO NOT commit this file
Write your test code
Finally, you got the End-to-End testing environment with the actions-on-google-testing library. Now you can
start writing your test code. Here, create the test code as the file named test.js.
$ vi test.jsLoad dependent modules
In the actions-on-google-testing, you need to load some dependent modules. And, here, use chai library to assert
each result.
Write the following code into the test.js file:
"use strict";

const {ActionsOnGoogleAva} = require("actions-on-google-testing");
const {expect} = require("chai");
const testCredentials = require("./test/test-credentials.json");
const action = new ActionsOnGoogleAva(testCredentials);
Start a conversation
Then, you need to start a test and to start a conversation with your app you want to test. To start a test, you can
use the startTest() function. Also, to start a conversation, you can use the startConversation() function. The code
will be like the following:
action.startTest("Happy path", action => {
  return action.startConversation()
    .then(
      ...
    );
});
Probably, you will use the startTest() function for each test scenario. For example, the sample code above defines
the “Happy path” scenario. You will be able to also define other scenario named “Invoke help” and so on.
When you don’t specify any arguments for the startConversation() function, the actions-on-google-testing library
tries to invoke a test app. For example, the “my test app” is used as the app name in en-US locale. That is, the
actions-on-google-testing says “Talk to my test app” to invoke an app.
Specify the app name explicitly
When you have already registered some app name, you cannot invoke the app with the “my test app”. Instead, you can
use the startConversationWith() function to invoke your app using the app name. That is, you can specify the app name
as the first argument for the startConversationWith() function. The following code invokes an app with the
“Personal Chef” name.
action.startTest("Happy path", action => {
  return action.startConversationWith("Personal Chef")
    .then(
      ...
    );
});
Specify the invocation phrase
If your app supports an explicit invocation, you need to specify some invocation phrase at invoking your app. Both
the startConversation() and startConversationWith() functions are supporting the invocation phrase. You can use
them as like the following:
startConversation("to find a homemade cannoli recipe")- “Talk to my test app to find a homemade cannoli recipe”startConversationWith("Personal Chef", "to find a homemade cannoli recipe")- “Talk to Personal Chef to find a homemade cannoli recipe”
Say something to your app
In your test case, you need to say something phrase to your app. The actions-on-google-testing library provides you
the send() function to say something from your test code to your app. The send() function is a flexible function.
Actually, the startConversation() and startConversationWith() call the send() function internally to say the
phrase to invoke your app.
You can use the send() function as like the following:
action.startTest("Happy path", action => {
  return action.send("Talk to Personal Chef")
    .then(
      ...
    );
});
Their functions send some phrase to your app. And, your app returns each response. You can receive the responses
with a callback function passed to the then() function. Using the then() function, you can continue the
conversation by sending phrases on after another as like the following:
action.startTest("Happy path", action => {
  return action.startConversationWith(
      "Personal Chef", "to find a homemade cannoli recipe")
    .then(response => {
      return action.send("Start the cooking");
    })
    .then(response => {
      return action.send("Next step");
    })
    .then(response => {
      return action.send("Ok, thanks");
    });
});
Validate responses
Callback functions passed the then() function are called with each responses from the app. Each response has
some properties including the textToSpeech, the ssml, the suggestions and so on. In your test code, you can
validate each values. The following code validates each response value with the chai library.
action.startTest("Happy path", action => {
  return action.startConversationWith(
      "Personal Chef", "to find a homemade cannoli recipe")
    .then(response => {
      expect(response.textToSpeech[0]).to.have.string(
          "Ok, let's start the cooking of cannoli. Are you ready?");
      expect(response.micOpen).to.be.true;
      return action.send("Start the cooking");
    })
    .then(response => {
      expect(response.textToSpeech[0]).to.have.string(
          "Thank you. First step is ...");
      expect(response.micOpen).to.be.true;
      return action.send("Next step");
    })
    .then(response => {
      expect(response.textToSpeech[0]).to.have.string(
          "... That's all. Would you find other recipe?");
      expect(response.micOpen).to.be.true;
      return action.send("No, thanks");
    })
    .then(response => {
      expect(response.textToSpeech[0]).to.have.string("Bye");
      expect(response.micOpen).to.be.false;
    })
});
Internationalization
The actions-on-google-testing library supports an internationalization. By default, the “en-US” locale is applied. The Google Assistant has been supporting many languages. Of course, invocation triggers are different from each language. The actions-on-google-testing library has currently supported 22 languages. The language list is the following:
- en-US, en-GB, en-AU, en-SG, en-CA, fr-FR, fr-CA, ja-JP, de-DE, ko-KR, es-ES, es-419, pt-BR, it-IT, ru-RU, hi-IN, th-TH, id-ID, da-DK, no-NO, nl-NL, sv-SE
The actions-on-google-testing library provides the setLocale() function to set the locale you want to test. If you
set the “fr-FR” locale with the setLocale() function and you use the startConversation() function, the
actions-on-google-testing library will say the following invocation phrase in French.
- “Parler avec mon application test”
The following code shows you how to use the setLocale() function:
action.setLocale("fr-FR");
action.startTest("Happy path", action => {
  return action.startConversationWith("Chef personnel")
    .then(response => {
      expect(response.textToSpeech[0]).to.have.string(
          "Bienvenue dans l'application Personal Chef. Que veux-tu cuisiner?");
      return action.send("Du boeuf.");
    })
    ...
});
How to run the test code
The actions-on-google-testing library uses the ava JavaScript test runner. When
installing the actions-on-google-testing library with the npm command, the ava library is installed at the same
time. If you create the file for testing named test.js, you can run the test code by the following command:
$ ./node_modules/.bin/ava -c 1 -s ./test.jsIf the execution succeeded, you will see the output log like the following:
** Starting test Happy path **
> Talk to Hexadecimal conversion about 10
{ micOpen: false,
  textToSpeech:
   [ '<speak>The decimal number 10 is a <say-as interpret-as="char...' ],
  displayText:
   [ 'The decimal number 10 is a a hexadecimal number.The hex...' ],
  ssml: [],
  suggestions: [] }
test passes
> cancel
{ micOpen: false,
  textToSpeech: [],
  displayText: [],
  ssml: [],
  suggestions: [] }
test ends

  1 passed
Conclusion
The actions-on-google-testing library is still a developer preview. Therefore, you can propose your idea anytime. Of course, breaking changes are also welcomed. As the ecosystem of the Google Assistant and the Actions on Google, this library is very important. I expect that many developers post many proposals, send many pull requests and send a lot of feedback.